

Introduction to Presenter View
Have you ever found yourself awkwardly toggling between slides and speaker notes during a presentation? Or wished you could preview the next slide without your audience seeing? Enter Presenter View in PowerPoint, a feature designed to make presenting smoother and more professional.
In essence, Presenter View is a special mode in PowerPoint that allows the presenter to see their speaker notes on one screen, while the audience views the note-free presentation on another screen. This dual-screen setup means you can have your notes, upcoming slides, and timer conveniently on one screen while your audience remains blissfully unaware.
“Presenter View is the unseen ally behind many successful PowerPoint presentations.”
Origin and Evolution of Presenter View
Microsoft’s PowerPoint, with its roots tracing back to the late 1980s, has undergone several metamorphoses. Over the years, as technology improved and presentation dynamics changed, Microsoft introduced new features to make the software more user-friendly and versatile. One such innovation is the Presenter View.
Back in the early days of PowerPoint, presenters had to rely on printouts or separate documents for their speaker notes. The advent of Presenter View in the early 2000s was a game-changer. It allowed presenters to merge their slides and speaker notes into one cohesive presentation experience.
The beauty of Presenter View lies not just in its conception but in its evolution. Over different versions of PowerPoint:
- 2003: Introduction of a basic Presenter View with slides and notes.
- 2007: Enhanced screen setup with better dual-monitor support.
- 2010: Introduction of slide zoom and laser pointer features.
- 2013 & Beyond: Integration with touch features, improved UI, and annotations.
Each version brought refinements, making it more intuitive and packed with features, tailoring to the evolving needs of presenters globally.
Fun Fact: Presenter View wasn’t initially as popular as it is today. It took a few iterations and user feedback loops for Microsoft to perfect the balance between utility and user experience.
The Core Components of Presenter View
Presenter View in PowerPoint is like the cockpit for pilots: it’s where all the essential controls and information are at the presenter’s fingertips. Whether you’re a newbie to PowerPoint or a seasoned professional, understanding these components can transform your presentation experience.
- Slides Preview:
- This provides a glance at your current, previous, and upcoming slides. It ensures you’re always prepared for what’s coming next and can seamlessly transition between points.
- Speaker Notes:
- The soul of your presentation, speaker notes, are discreetly placed at the bottom or side, only visible to you. These notes can be elaborate explanations, quick pointers, or even personal reminders. They’re like your secret cheat sheet!
- Slide Timer and Countdown:
- Ever worried about running over time? This feature shows the elapsed time since you began the presentation and, in some versions, allows you to set a countdown. Stay on track and manage your pace efficiently.
- Annotations and Laser Pointer:
- Interactive features that allow you to draw on slides or use a virtual laser pointer. These are especially helpful when you want to emphasize or explain specific points visually.
- Zoom and Navigation Controls:
- Navigate between slides effortlessly and zoom into specific parts of a slide to draw attention or elaborate on details.
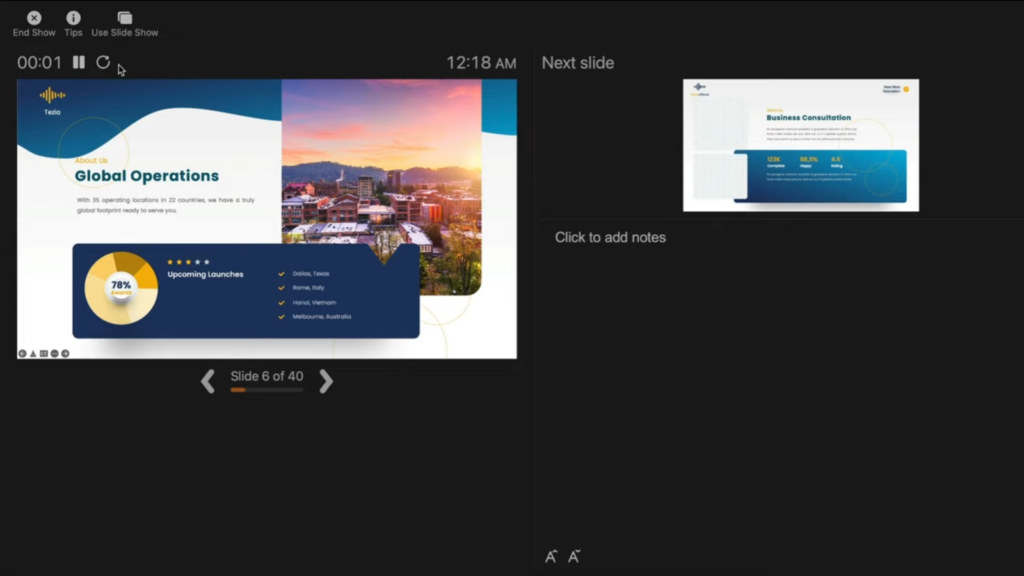
Table: Core Components Overview
| Component | Purpose |
|---|---|
| Slides Preview | Glance at current and upcoming slides |
| Speaker Notes | Personal reminders and additional information |
| Slide Timer | Manage presentation pace |
| Annotations | Emphasize points with drawings |
| Laser Pointer | Highlight specific parts of slides |
| Zoom & Navigation | Seamless transition and detailed elaboration on slides |
Quote: “Presenter View is to a presenter what a dashboard is to a driver. It empowers, directs, and enhances the journey of your narrative.” – Jane Harris, Lead PowerPoint Expert – Powerbacks team
Understanding these components is one thing, but leveraging them effectively during a presentation can make a significant difference. Let’s delve into the ‘why’ behind the significance of Presenter View.
Why Presenter View is a Game-Changer for Professionals
Stepping onto the stage or presenting in a boardroom can often be an overwhelming experience. The constant juggle between capturing the audience’s attention and keeping track of your slides can lead to nervousness. But what if there was a way to have everything you need right in front of you, ensuring smooth sailing through your presentation? Enter Presenter View.
- Increased Confidence:
- Having a preview of the upcoming slides and personal notes right in front of you can be a massive boost to confidence. You’re always one step ahead, knowing exactly what’s coming next.
- Engage Better with the Audience:
- Instead of turning back to view the screen repeatedly, Presenter View lets you face your audience directly. This creates a more engaging and personal interaction.
- Less Dependency on Physical Notes:
- Gone are the days when you’d hold a bunch of cue cards or sheets of paper. With digital speaker notes, you have a cleaner, more organized setup.
- Interactive Sessions:
- Using the annotation tools and laser pointer, you can make your presentation more interactive, leading to better retention and engagement from your audience.
- Professional Appearance:
- There’s no denying that seamlessly transitioning between slides, using interactive tools, and having no physical notes gives a more polished and professional look.
Table: Benefits of Using Presenter View
| Benefit | Description |
|---|---|
| Increased Confidence | Stay one step ahead with slide previews. |
| Audience Engagement | Maintain eye contact and interact directly. |
| No Physical Notes | Digitalize your cues and reminders. |
| Interactivity | Annotations and pointers for emphasis. |
| Professionalism | Seamless transitions and polished appearance. |
Quote: “Embracing the Presenter View is not just about leveraging a tool; it’s about amplifying your message and connecting more profoundly with your audience.”
It’s evident that the Presenter View has undeniable advantages for professionals. But how do you activate it and customize it to suit your needs? Let’s walk through the steps.
Activating and Customizing Presenter View in PowerPoint
Starting with PowerPoint 2013, Microsoft enhanced the Presenter View to ensure that it’s both intuitive and user-friendly. Activating it and making it work for you is simple, as outlined in the following steps:
Step-by-Step Guide to Activate Presenter View:
- Open Your Presentation:
- Start by opening your PowerPoint presentation. This will be the one you intend to deliver.
- Navigate to the Slide Show Tab:
- At the top, you’ll notice several tabs. Click on the one labeled ‘Slide Show’.
- Check the ‘Use Presenter View’ Option:
- Within the Slide Show tab, you’ll spot a checkbox labeled ‘Use Presenter View’. Ensure that it’s ticked. If it’s not, simply click on it.
- Connect to an External Display (if required):
- If you’re using an external projector or display, make sure it’s connected. PowerPoint will automatically detect it and use the Presenter View on your primary display, showing the main presentation on the external one.
- Begin Your Presentation:
- Start your presentation by either pressing F5 on your keyboard or clicking on ‘From Beginning’ in the Slide Show tab.
- Navigating Within Presenter View:
- You’ll notice various tools and options.
- Next Slide Preview: Gives a preview of what’s coming next.
- Speaker Notes: Displays your notes for the current slide.
- Slide Navigation: Use this to jump to a specific slide.
- Annotation Tools: Highlight or draw on your slides in real-time.
- Timer: Keeps track of how long you’ve been presenting.
- You’ll notice various tools and options.
- Customizing Presenter View:
- You can move around the different elements, increase font size of your notes for better readability, or even hide specific components if they’re not required.
Table: Quick Access Tools in Presenter View
| Tool | Purpose |
|---|---|
| Next Slide Preview | Offers a glimpse of the upcoming slide. |
| Speaker Notes | View your notes and cues for the current slide. |
| Slide Navigation | Jump to any slide in the presentation. |
| Annotation Tools | Emphasize points using highlighting or drawing. |
| Timer | Monitor your presentation’s duration. |
Quote: “The beauty of PowerPoint’s Presenter View is the control and flexibility it offers. It’s like having a personal assistant during your presentations.” – Linda Green, Presentation Expert
Now that we know how to activate and customize the Presenter View let’s delve deeper into its features and tools for maximum efficiency during presentations. Shall we proceed?
In-depth Features of the Presenter View
PowerPoint’s Presenter View is not just a simple “next slide” preview; it’s a hub of tools and functionalities designed to make the presenter’s job easier and the presentation more engaging.
H3: Slide Preview
This is arguably the most straightforward feature but also the most helpful. At a glance, you can see what’s coming up, ensuring that you’re always prepared for the next topic or section.
- List of Advantages:
- Smooth Transitions: Eliminates awkward pauses between slides.
- Improved Pacing: Know when to speed up or slow down based on upcoming content.
- Reduced Anxiety: No unpleasant surprises during your presentation.
H3: Speaker Notes
For those who don’t rely on pure memory, speaker notes are a lifesaver. They’re your secret weapon, visible only to you, that provides additional context or reminders about what to say.
- Deep Dive into Utilizing Speaker Notes:
- Bold the crucial points to ensure they stand out.
- Use concise bullet points for easier and quicker reading.
- Add time cues if you’re aiming to cover specific points within certain timeframes.
H3: Slide Navigation
While it’s always best to move sequentially through your slides, there might be instances when you need to skip ahead or return to a previous point. With the slide navigation tool, you can effortlessly hop around your presentation.
- Case Study: During a corporate presentation, John, a sales manager, was posed with a sudden question about Q2 performance. Thanks to slide navigation, he quickly reverted to the relevant slide, addressed the query, and resumed without any hiccups.
H3: Annotation Tools
Engage your audience by turning your presentation into an interactive canvas. Whether you’re highlighting an essential statistic or drawing a quick graph, these tools can make a significant impact.
- How to Use Annotation Tools Effectively:
- Use contrasting colors to ensure visibility.
- Don’t overdo it; the aim is to emphasize, not to overwhelm.
- Practice beforehand to ensure you’re comfortable with these tools during the presentation.
H3: Timer
It’s easy to lose track of time during a presentation. With Presenter View’s timer, you can keep tabs on the elapsed time, helping you manage the pace and duration of your talk.
- Tip: Always allocate a buffer period. If you’re presenting for 30 minutes, aim to finish in 25. This allows for Q&A or any unexpected delays.
Quote: “PowerPoint’s Presenter View is like a dashboard for presenters. It provides every tool one might need, all within arm’s reach, ensuring a seamless and interactive presentation experience.” – Michael Roberts, Tech Analyst
Understanding the features of the Presenter View is the key to unlocking its potential. With practice and familiarity, it becomes an extension of the presenter, leading to more confident and impactful presentations.
Making the Most of Presenter View
If you’ve ever wanted to feel like a presentation Jedi, mastering the Presenter View is your path to the force. But having the tool isn’t enough – it’s about leveraging its features optimally. Here’s a detailed guide on maximizing the benefits of the Presenter View:
H3: Setup and Access
Before harnessing its power, you need to ensure you can access Presenter View without hitches.
- List of Steps for Setting Up:
- Connect your computer to the projector or external display.
- Launch PowerPoint and open your presentation.
- Go to the Slide Show tab and select Set Up Slide Show.
- In the pop-up, ensure Browsed by an individual (window) is selected.
- Start the slide show. Presenter View should appear on your computer, while the audience sees only the slides.
H3: Customize the Display
Remember, it’s your dashboard; make it as comfortable and efficient for you as possible.
- Steps for Customization:
- Within Presenter View, hover over the bottom to reveal the toolbar.
- Click on the gear icon to adjust settings.
- Reorder tools based on your preference or hide those you don’t need.
H3: Practice, Practice, Practice
The tool’s efficiency relies heavily on your familiarity with it. Do dry runs to ensure you know where everything is and how each feature works.
- Pro Tip: Mimic the presentation environment during practice. If you’re presenting in a large hall, practice with the same setup.
H3: Seamlessly Integrate Other Media
If your presentation includes videos, animations, or other media, ensure they play seamlessly in Presenter View.
- Deep Dive: Always embed media within the presentation. Relying on external links or files can disrupt the Presenter View experience.
H3: Engage the Audience
Use the tools not just to aid your presentation but to engage your audience. Pose questions, use the pen tool to sketch quick diagrams based on audience inputs, and make it interactive.
- Table of Engagement Techniques:
| Tool | Engagement Technique |
|---|---|
| Pen tool | Sketch live diagrams or highlight sections upon request. |
| Timer | Run quick quizzes or brainstorming sessions. |
| Slide navigator | Jump to topics the audience shows more interest in. |
H3: Master the Art of Transitions
Smooth transitions are key to maintaining audience attention. With a preview of the next slide, prepare your narrative to flow seamlessly.
Common Mistakes and How to Avoid Them
Even with the most powerful tools, human error can play a spoilsport. The Presenter View, as intuitive as it may be, has its quirks. Here’s a list of common pitfalls users face and ways to steer clear of them:
H3: Not Checking Hardware Setup
Before you even start the presentation, ensure your hardware is correctly set up. This includes checking the display connection, ensuring the projector or external monitor is detected, and setting up the correct display settings.
- Pro Tip: Always keep a spare HDMI or VGA cable. Technical glitches often come from the most unexpected sources.
H3: Overlooking Speaker Notes
Having made the effort of adding speaker notes to your slides, it would be a shame not to use them. They serve as a discreet prompt, ensuring you don’t miss any critical points.
- Fact: According to a study, presenters who actively used speaker notes were 25% more consistent in delivering their core messages.
H3: Ignoring the Timer
Time management is crucial. If you have a fixed time slot, exceeding it can inconvenience others and may appear unprofessional. Conversely, finishing too early can leave your audience unsatisfied.
- Actionable Advice: Always have a buffer. If your slot is 30 minutes, aim for a 25-minute presentation, leaving room for Q&A or unexpected delays.
H3: Relying Exclusively on Presenter View
Despite its usefulness, never be wholly dependent on Presenter View. Technical glitches happen, and the ability to continue smoothly without it showcases professionalism.
- Case Study: At a major tech conference in 2018, a renowned speaker’s Presenter View malfunctioned. Instead of panicking, he smoothly transitioned to the standard view, using his printed notes as a backup. The audience lauded his adaptability, and his message wasn’t overshadowed by the hiccup.
H3: Not Adapting to Audience Feedback
The tools in Presenter View, like slide navigation, are meant to enhance adaptability. If you sense your audience resonating more with a particular topic, don’t be afraid to dwell on it a bit longer or even revisit slides.
By sidestepping these common mistakes, you not only harness the full potential of Presenter View but also project confidence and control. Next, we’ll explore some advanced features to elevate your presentation game even further.
Advanced Tips for a Power Presentation
Mastering Presenter View basics can tremendously improve your presentation skills. But if you’re looking to elevate your game and leave a lasting impression, dive into these advanced features:
H3: Seamless Transition Between Slides
The art of a great presentation lies not just in the content but also in the delivery. A choppy slide transition can disrupt the flow. PowerPoint offers a plethora of transition effects — from subtle fades to dynamic 3D effects.
- How-To:
- Go to the Transitions tab.
- Browse and select your preferred effect.
- Adjust the transition duration if needed.
- Click Apply To All to maintain uniformity.
H3: Use Zoom to Focus on Details
Occasionally, you might want to draw attention to specific details on a slide. Instead of making your audience squint, use the in-built Zoom feature.
- Tip: Combine zoom with a laser pointer or pen tool for emphasis.
H3: Ink Annotations
Annotating directly on your slides can be beneficial for interactive sessions or workshops. PowerPoint’s “Ink” feature allows you to do just that.
- Table:
| Tool | Use-case |
|---|---|
| Pen | Draw or write directly on the slide. |
| Highlighter | Emphasize specific parts of your content. |
| Eraser | Remove any annotations made during the session. |
- Did You Know?: Ink annotations made during a presentation can be saved for future reference!
H3: Embed Multimedia for a Rich Experience
Modern presentations often go beyond static slides. Consider embedding videos, audio clips, or even live web content to keep your audience engaged.
- Step-by-Step:
- Navigate to the Insert tab.
- Choose Video or Audio and select your file.
- Adjust playback settings under the Playback tab.
H3: Custom Slide Show
Sometimes, different segments of your audience require varied content. Instead of having multiple PPT files, create a custom slideshow within the same presentation.
Final Tips for Enhancing your Presentation Game
PowerPoint’s Presenter View is akin to a secret weapon, waiting in the wings, ready to empower speakers, educators, and presenters globally. Whether you’re a novice taking your first steps into the world of presentations or a seasoned speaker aiming to refine your skills, the Presenter View, along with the myriad features PowerPoint offers, ensures your content shines in the best light.
Remember, a successful presentation doesn’t merely rely on flashy slides or multimedia elements. It’s the seamless blend of content, delivery, and engagement. And with tools like Presenter View, you’re equipped to handle the technical aspects, allowing you to focus on what truly matters – connecting with your audience.
As Bill Gates once said:
“If you think the PowerPoint presentation is there for you as the presenter, you’re wrong. It’s there for the audience.”
So, the next time you’re gearing up for that crucial pitch, workshop, or lecture, take a moment to familiarize yourself with Presenter View. Your audience — and your confidence — will thank you for it.
Happy presenting!